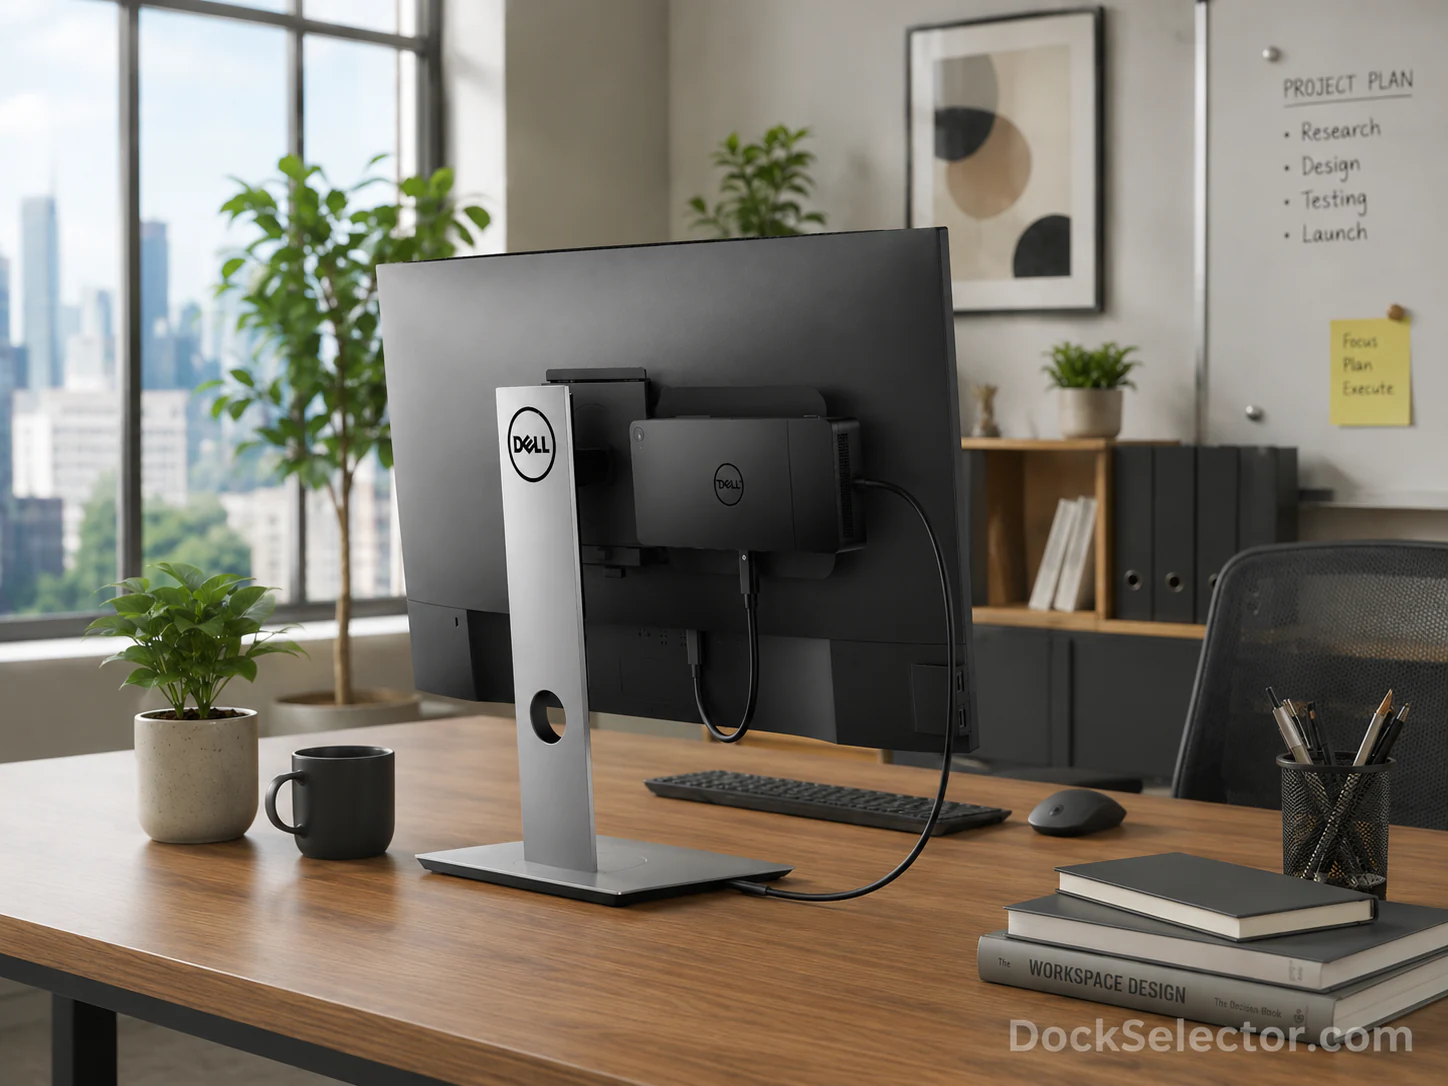
Your docking station was supposed to simplify your desk. Instead, it sits there — a black brick surrounded by a tangle of USB, Ethernet, DisplayPort, and power cables, eating up space that could be clean and open.
The irony is hard to miss: the device designed to reduce cable chaos has become the most visible source of it.
Dell's MK15 mounting kit solves exactly that. It lets you tuck your docking station completely out of sight, behind the monitor it's already powering. No cables on the desk. No dock taking up space. Just a clean setup that looks like you know what you're doing.
This guide walks you through everything: compatibility, installation, and a community-verified trick that extends MK15 support beyond Dell's official list.
What Is the Dell MK15?
The MK15 is a VESA-compatible metal bracket designed specifically to hold a Dell docking station behind a monitor. It installs between the monitor and its stand (or monitor arm), using the same VESA 100mm × 100mm mounting pattern that almost every monitor uses.
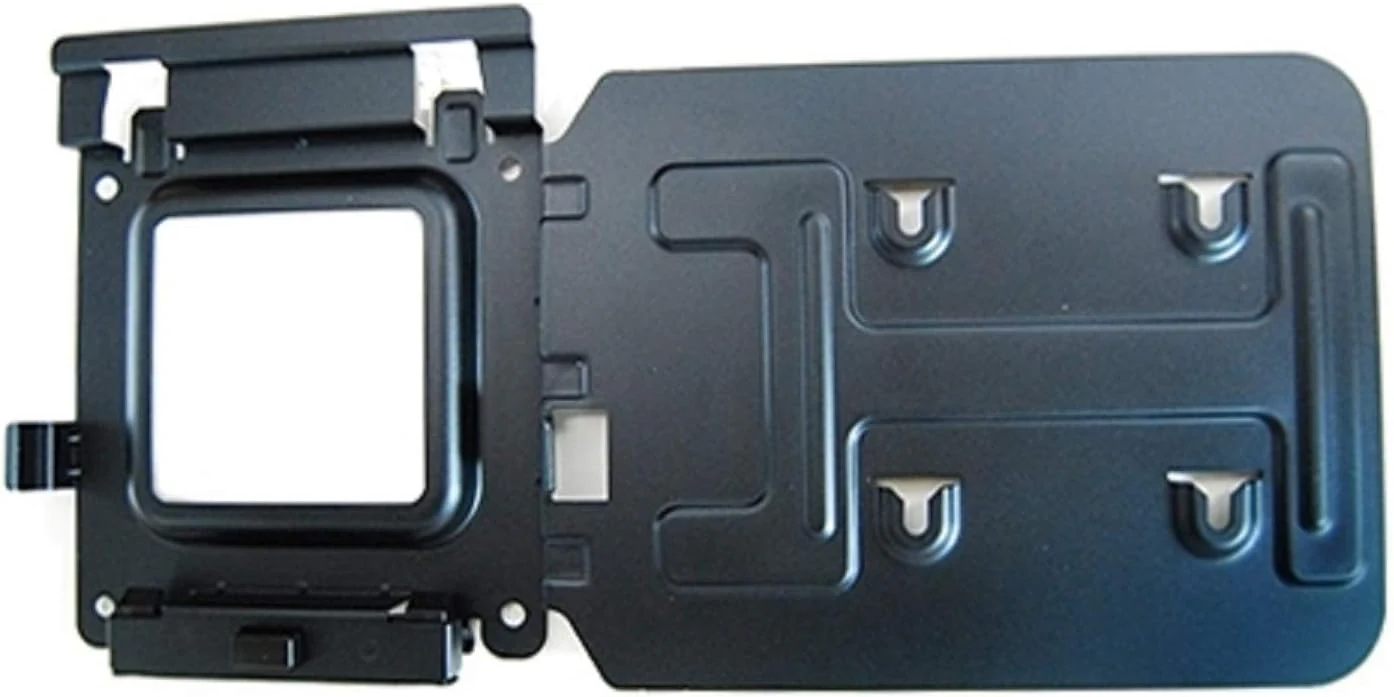
Once installed, the dock slides onto the bracket and locks in place — all connection cables route behind the monitor instead of across your desk.
The MK15 was bundled with older  WD15 docks and is also sold separately. You can often find it on Amazon or other secondhand marketplaces for $10–$20.
Compatibility: Does Your Gear Support the MK15?
Compatible Docking Stations
The MK15 is designed for the following Dell docks:
| Dock Model | Dock Page |
|---|---|
| WD15 | View on Amazon → |
| WD19 / WD19S | View specs → |
| WD19TB / WD19TBS | View specs → |
| WD19DC / WD19DCS | View specs → |
The bracket may physically fit other Dell docks that share the same screw hole pattern, but only the WD15 and WD19 series are officially supported. Note that the MK15 was originally bundled with the WD15 dock.
Officially Compatible Monitors
Dell has tested and confirmed the following monitors for use with the MK15. Use the tables below to quickly check if your monitor is on the list.
P-Series Monitors
| P1917S | P2018H | P2217H |
| P2219H | P2219HC | P2317H |
| P2319H | P2415Q | P2417H |
| P2418D | P2418HT | P2418HZ |
| P2418HZm | P2419HC | P2717H |
| P2719H | P2719HC | P3418HW |
| P4317Q |
UltraSharp (U-Series) Monitors
| U2415 | U2417H | U2417HJ |
| U2417HWi | U2419HC | U2518D |
| U2518DR | U2718Q | U2719D |
| U2719DC | U2917W | U3219Q |
| U3415W | U3417W | U3419W |
| U3818DW | UP2718Q | UP3017 |
| UP3216Q |
WD15 vs WD19 monitor compatibility note: The tables above show the full combined list across all supported docks. The WD15 supports a subset — excluding P2217H, P2219HC, P2417H, P2717H, P2719HC, P4317Q, U2415, U2417HWi, U2419HC, U2518DR, U2719D, U2719DC, U2917W, U3219Q, U3419W, UP3017, and UP3216Q. The WD15 does uniquely support the U3818DW (not compatible with WD19-series docks). All other monitors in the tables work with both dock families.
Step-by-Step Installation
The official installation follows the Dell MK15 Setup Guide. Here is the process broken down into three steps.
Step 1: Remove the Monitor Stand
Turn off your monitor and lay it face-down on a soft surface (a towel or microfiber cloth works). Press the release button on the stand and lift it off the VESA mounting bracket.
If you're using a monitor arm instead of the original stand, remove the arm from the VESA plate the same way.
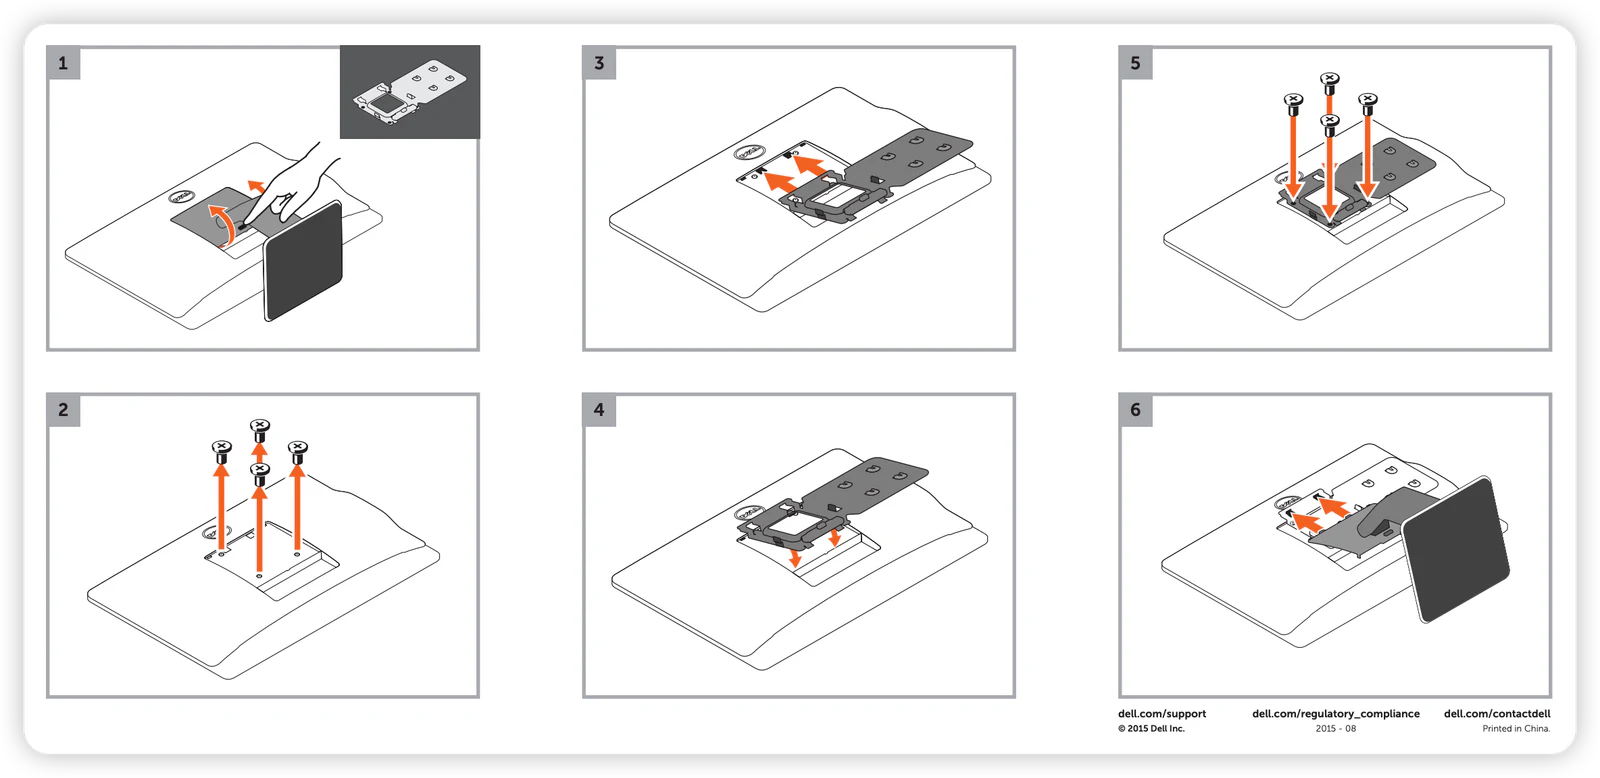
Step 2: Attach the MK15 Bracket to the VESA Mount
Line up the MK15 bracket with the four VESA screw holes on the back of your monitor (100mm × 100mm spacing). The bracket's cutout should face upward — this is the slot the dock will slide into.
Secure the bracket using the screws that came with your MK15 kit or your monitor's original VESA screws. Tighten them firmly, but don't overtighten — the bracket should sit flush against the monitor without bending.
If your monitor uses a quick-release mount (common on Dell P&U-series): The MK15 installs between the quick-release plate and the monitor. Attach the MK15 first, then reattach the quick-release plate on top of it.
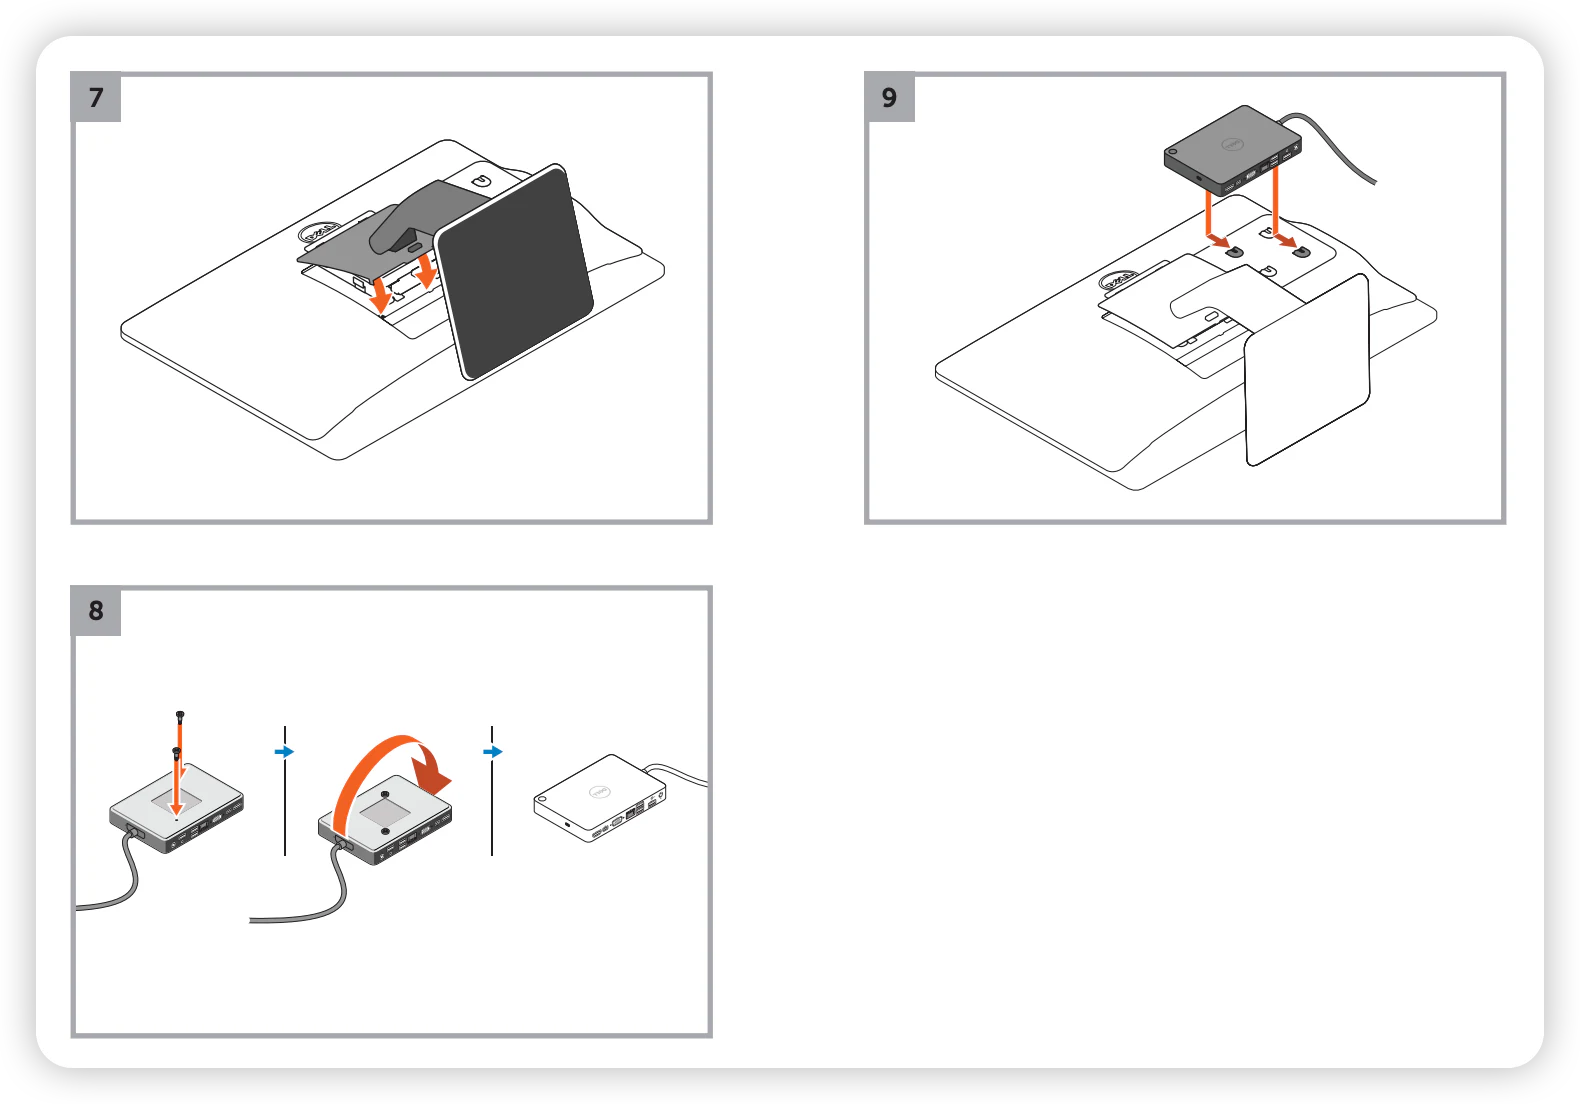
Step 3: Reattach the Stand and Mount the Dock
Reattach your monitor stand or arm through the MK15 bracket. Both the bracket and the stand share the same VESA holes, so they stack cleanly.
Now for the dock itself:
- Attach the two included mounting screws to the bottom of your dock. These screws have wide heads designed to slide into the MK15 bracket slots.
- Lift the dock up to the bracket and guide the screw heads into the slots.
- Slide the dock downward until it locks into place.
All your cables — USB, Ethernet, DisplayPort, power — now connect behind the monitor instead of across your desk. The dock is completely hidden from view, and you have a single, clean cable path from monitor to laptop.
Your Monitor Isn't on the List? Here's a Community-Tested Workaround
Dell's official compatibility list covers roughly 30 monitors — but that doesn't mean the MK15 only works with those models.
At its core, the MK15 is just a VESA bracket. If your monitor has a standard 100mm × 100mm VESA mount, the MK15 can technically attach to it. The real limitation is recess depth: some monitors have VESA mounting holes set deeper into the chassis, and the MK15 bracket can't reach them with standard-length screws.
One Dell community member documented a successful workaround for the S3422DWG ultrawide monitor — a display that is not on Dell's official MK15 compatibility list. His solution: M4 threaded standoffs.
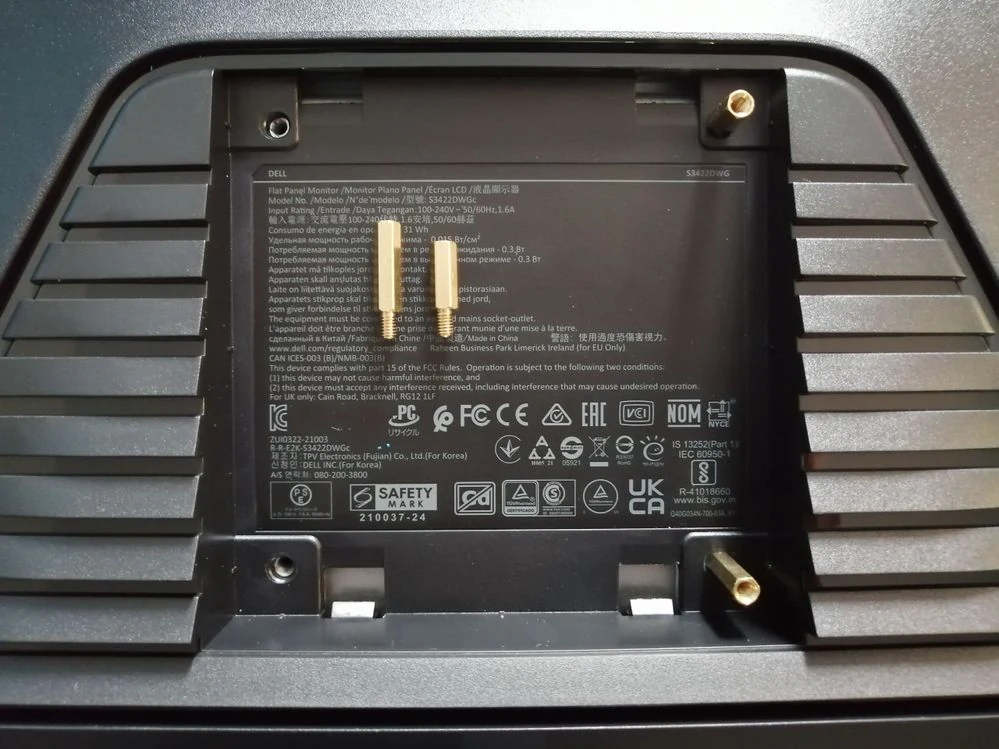
How the Standoff Method Works
Standoffs (also called spacers or hex spacers) are small threaded cylinders that extend the VESA screw holes outward from a recessed mount — essentially bringing the mounting surface flush with the bracket.
What was used on the S3422DWG:
| Position | Standoff Spec | Why |
|---|---|---|
| Bottom VESA holes | M4 × 15mm + 6mm | Deeper recess at the bottom of the monitor |
| Top VESA holes | M4 × 10mm + 6mm | Shallower recess at the top |
The "+6mm" is the male thread that screws into the monitor's VESA holes. The 15mm and 10mm are the spacer body lengths. This created a level mounting surface despite the uneven recess depth.
Steps for the Standoff Method
- Measure the VESA recess depth on your monitor — use a ruler or calipers to check how deep the screw holes sit relative to the back surface. Check both top and bottom, because they can differ.
- Buy M4 standoffs with the correct lengths. Look for steel (not aluminum or nylon) standoffs rated for at least 2–3 kg of load. You'll need an M4 male thread on one end (into the monitor) and an M4 female thread on the other (for the MK15 screws).
- Screw the standoffs into the VESA holes first. Hand-tighten, then give each one a quarter-turn with pliers wrapped in electrical tape (to avoid scratching).
- Mount the MK15 bracket on top of the standoffs using the bracket's included screws.
- Reattach your monitor stand or arm through the MK15 bracket.
- Mount the dock as described in Step 3 above.
The forum user reported that this setup held his WD19TBS securely behind a 34-inch ultrawide without issues. He did note that the bracket pattern doesn't align perfectly with the monitor's rear design aesthetically — but since it's on the back, no one sees it.
Important Risks and Limitations
The standoff method is community-verified, not officially supported by Dell. Before attempting it, understand these risks:
- Weight distribution changes. Standoffs create a gap between the monitor and its stand (or arm), shifting the monitor's center of gravity further from the mounting point. This is especially relevant for heavier displays — the added leverage can destabilize the monitor and strain the VESA mount beyond its design spec.
- Standoff quality varies. Cheap aluminum standoffs can strip threads or bend under load. Use steel standoffs with a load rating.
- Some monitors simply won't work. If your monitor's VESA area has raised plastic edges, cooling vents, or a curved rear panel that physically blocks the MK15 bracket, no amount of standoffs will help.
- Not all VESA patterns are equal. Rare monitors use 75mm × 75mm VESA. The MK15 requires 100mm × 100mm.
- No warranty coverage. If your monitor or dock gets damaged using a non-standard mounting method, Dell won't cover it.
Bottom line: The standoff method has been proven to work by real users, and the principle is mechanically sound. But it's a DIY modification — proceed with caution, use quality hardware, and double-check your measurements before drilling or tightening anything.
Before You Start: Quick Checklist
Run through these three checks before buying or installing an MK15:
- Verify your dock model. Only WD15, WD19, WD19S, WD19TB, WD19TBS, WD19DC, and WD19DCS are officially supported. If you're not sure which model you have, check the label on the bottom of your dock.
- Check your monitor's VESA pattern. Look at the back of your monitor — if you see four screw holes arranged in a square roughly 100mm apart, you have a VESA 100×100 mount. This is listed in your monitor's spec sheet under "VESA mount compatibility."
- Inspect the VESA recess. If the mounting holes are more than a few millimeters below the rear surface, you'll need standoffs. If there are raised ridges, vents, or connectors blocking the area around the VESA holes, the bracket may not fit flat.
Is the MK15 Worth It?
For a $10–$20 bracket, the MK15 delivers outsized value. It removes the single most visible source of cable clutter from your desk — the dock itself — and costs less than a decent cable management tray.
If your monitor is on the compatibility list, installation is a straightforward 10-minute job. And even if it isn't, the standoff workaround gives you a realistic path to the same clean-desk result on many more monitors.
The one thing the MK15 doesn't do is make your dock easier to access. If you frequently swap cables or peripherals, having the dock behind the monitor means reaching around more often. But for most fixed desk setups — one laptop, one or two monitors, a few permanent USB peripherals — the tradeoff is well worth it.
Ready to clean up your desk? Get the Dell MK15 mounting kit on Amazon →
If you're still deciding which Dell dock to get, check out our guide to choosing the right Dell docking station for model-by-model comparisons.
Source: Dell MK15 Setup Guide, Dell Community Forum